In summary:
- True expedition autonomy relies on technical skill and dynamic risk assessment, not just a packing list.
- Mastering cold-water self-rescue and real-time weather interpretation are non-negotiable survival skills.
- Protecting critical electronics demands a system of redundancy, as a single dry bag is a point of failure.
- Proper paddling biomechanics (torso rotation) is the key to endurance and injury prevention over multiple days.
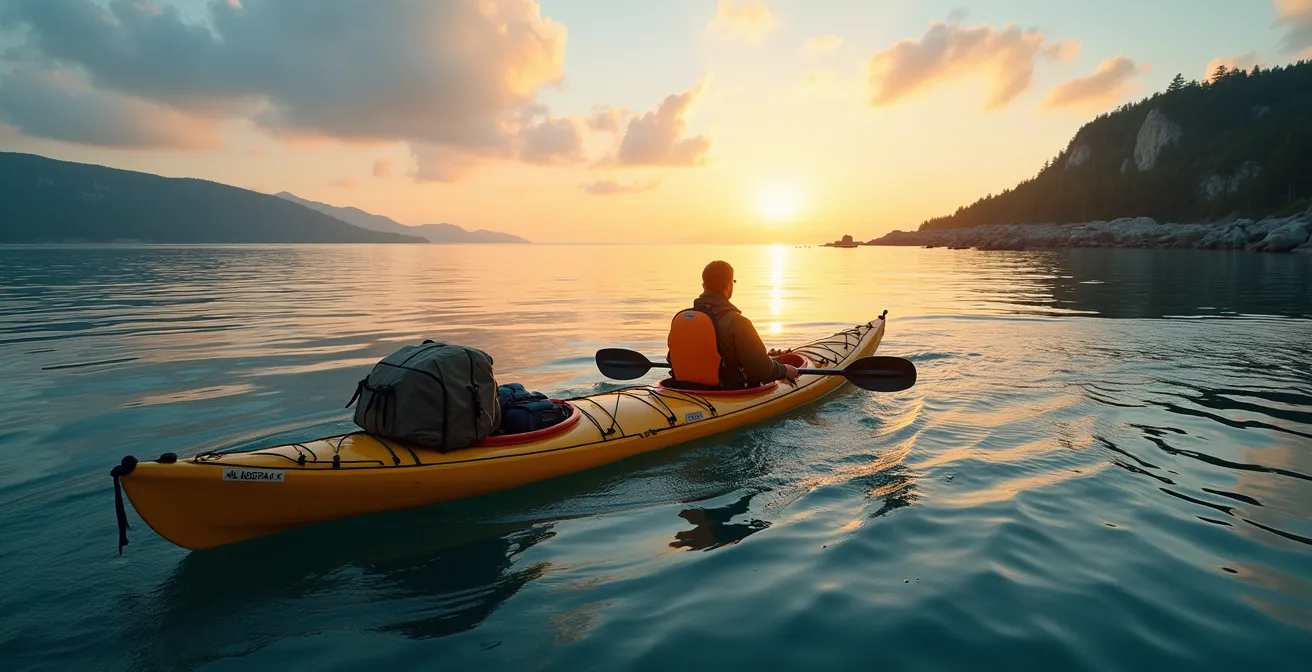
The allure of a self-supported kayak expedition is undeniable: the quiet glide across glassy water, the freedom of a route dictated only by the coastline and your own will, and the profound connection to the wild. Most planning guides for such trips focus on the static elements—the gear checklist, the food rations, the pre-plotted GPS waypoints. You’ve likely read the standard advice on packing a tent, a first-aid kit, and enough water.
But these lists, while essential, fail to address the dynamic reality of being alone at sea. They don’t prepare you for the moment your shoulder seizes with pain on day two, when a harmless-looking cloud on the horizon transforms into a violent squall, or when the simple act of closing a dry bag with salty hands compromises your most vital electronics. The common advice prepares you for the trip you *plan*, not the expedition you *experience*.
What if the key to true autonomy wasn’t in the gear you pack, but in the skills you master? This guide moves beyond the checklist to build a framework for dynamic risk assessment. We will deconstruct the critical technical skills that separate a successful, independent journey from a potential disaster. We will focus on the ‘why’ and ‘how’—from paddling biomechanics that prevent injury, to reading the environment as your primary source of data, and executing a self-rescue when no one is there to help.
This article provides a technical roadmap for the aspiring expedition paddler. Each section is designed to build your competence and confidence, empowering you to handle the unexpected and transform a challenging adventure into a mastered craft. The following summary outlines the key areas we will cover to achieve true self-sufficiency on the water.
Summary: Your Technical Roadmap to Kayak Expedition Mastery
- Why Poor Paddling Technique Causes Shoulder Injury by Day 2?
- Sit-On-Top or Sit-Inside: Which Kayak Handles Rough Swell Better?
- The Dry Bag Mistake That Ruins Electronics on Saltwater Trips
- How to Interpret Cloud Formations to Predict Sudden Squalls?
- What to Do Specifically When You Capsize in Cold Water Alone?
- Anchoring or Mooring Buoys: Which Method Saves the Seabed?
- How to Paddle Safely When the Mistral Wind Exceeds 40 km/h?
- When to Kayak the Calanques to Avoid the Summer Flotilla?
Why Poor Paddling Technique Causes Shoulder Injury by Day 2?
Shoulder pain is the bane of multi-day kayak trips, often appearing suddenly and derailing an entire expedition. The root cause is almost never a lack of strength, but a fundamental misunderstanding of paddling biomechanics. Many paddlers instinctively use their arms and shoulders to pull the paddle through the water, a method known as “paddling with your arms.” This isolates the small, fatigue-prone deltoid and rotator cuff muscles, placing them under immense repetitive strain.
The correct, sustainable technique involves the entire kinetic chain, starting from your feet and driving through your legs, hips, and core. The power of the stroke comes from torso rotation, where your large back and abdominal muscles do the majority of the work. Your arms and shoulders act merely as a framework or strut, transferring this core-generated power to the paddle blade. By rotating your torso, you engage a much larger, more resilient muscle group, drastically reducing the load on your shoulders.
On day one, poor technique might only cause minor fatigue. By day two, the cumulative micro-trauma leads to inflammation and acute pain in the rotator cuff. This is not just a comfort issue; a debilitating shoulder injury in a remote location is a serious safety emergency. Mastering proper form is the single most important factor for injury prevention and endurance on a self-supported trip. It transforms paddling from an arm exercise into a full-body, sustainable activity.
Sit-On-Top or Sit-Inside: Which Kayak Handles Rough Swell Better?
The choice between a sit-on-top and a sit-inside kayak is a critical decision that directly impacts performance and safety in challenging conditions. For calm, recreational paddling, either may suffice. However, for a self-supported expedition involving open water and potential rough swell, the sit-inside (or touring) kayak is unequivocally superior. The reason lies in two key concepts: secondary stability and paddler-boat connection.
Sit-on-tops often have high primary stability, meaning they feel very stable on flat water. However, they possess limited secondary stability, which is the boat’s ability to remain stable when put on its edge—a necessary action for maneuvering in waves. A sit-inside kayak is designed with superior secondary stability, allowing the paddler to lean and “edge” the boat, using its hull shape to carve through and brace against waves effectively. This dynamic control is impossible to achieve on a sit-on-top.
Furthermore, the cockpit of a sit-inside kayak provides crucial points of contact. Thigh braces and hip pads allow the paddler to integrate their lower body with the boat, effectively making it an extension of themselves. This direct connection is vital for advanced maneuvers like rolling and high bracing, and it provides the feedback needed to feel and react to the water’s movement. In rough swell, a sit-on-top paddler is merely a passenger, whereas a sit-inside paddler is an active pilot.
| Feature | Sit-Inside | Sit-On-Top |
|---|---|---|
| Secondary Stability | Superior – allows leaning and edging into waves | Limited – wider but less dynamic control |
| Connection to Boat | Direct via thigh braces and hip pads | Minimal – no lower body engagement |
| Cold Water Safety | Protected cockpit keeps paddler drier | Full exposure when capsized |
| Recovery Techniques | Roll or paddle-float re-entry possible | Easier re-entry but paddler remains wet |
The Dry Bag Mistake That Ruins Electronics on Saltwater Trips
On a multi-day expedition, your electronics—GPS, phone, satellite messenger—are your lifeline. The most common mistake paddlers make is assuming a single, standard dry bag is sufficient protection. This assumption represents a critical failure in risk assessment. A single point of failure is unacceptable for essential gear. The real threats in a saltwater environment are more insidious than just a simple leak; they involve seal contamination and internal condensation.
Every time you open and close a roll-top dry bag, microscopic salt crystals from your hands or the air can contaminate the sealing surfaces. These crystals prevent a truly waterproof seal and can even abrade the material over time, creating micro-leaks. A bag that seems perfectly dry in a freshwater test can fail catastrophically at sea. Furthermore, temperature fluctuations between a warm day and a cool night will cause condensation to form *inside* a sealed bag, effectively soaking your electronics from within.
Case Study: Professional Waterproofing Systems
An extensive test by OutdoorGearLab since 2018 highlights the need for robust systems. While a high-end bag like the YETI Panga Backpack 28 provides excellent protection with its welded seams, they note that for truly critical equipment, expedition paddlers should consider superior systems like the Watershed Colorado Duffel. Crucially, they emphasize the often-overlooked threat of internal condensation, recommending the use of desiccant packs as an essential component to combat this internal moisture threat in any sealed bag.
The only reliable solution is a multi-layered approach based on the principle of system redundancy. Each layer addresses a different type of threat—impact, pressure, water ingress, and condensation—ensuring that if one layer fails, your critical gear remains protected.
Your Action Plan: The Triple Redundancy System for Electronics
- Layer 1 (Impact Protection): Place electronics inside a hard-sided, pressure-resistant case (e.g., Pelican). This protects against crushing and impact.
- Layer 2 (Water Ingress): Put the hard case inside a high-quality, heavy-duty roll-top dry bag. Ensure the top is rolled at least three full times.
- Layer 3 (Secure Storage): Store this package in the most protected hatch of your kayak, typically a central or day hatch, away from potential impact zones.
- Critical Maintenance: Before every closure, wipe the dry bag’s sealing surfaces with a cloth dampened with fresh water to remove any salt crystals.
- Condensation Control: Add several silica gel desiccant packs inside both the hard case and the dry bag to absorb any internal moisture buildup.
How to Interpret Cloud Formations to Predict Sudden Squalls?
Relying solely on a pre-trip weather forecast is a dangerous habit for a self-supported kayaker. Marine weather is notoriously localized and can change with terrifying speed. The ability to practice environmental literacy—reading the immediate signs in the sky and on the water—is a far more critical and reliable skill for real-time safety decisions. Clouds are the most visible indicator of atmospheric stability and impending weather.
While fluffy, fair-weather cumulus clouds are benign, the key is to monitor them for rapid vertical development. If you observe these clouds growing upwards into towering columns (cumulus congestus), it’s a clear sign of an unstable atmosphere with significant energy. This is the precursor to a thunderstorm or squall. The final, unmissable warning sign is the formation of an arcus cloud, or shelf cloud, on the leading edge of the storm.
This low, horizontal, wedge-shaped cloud forms as the storm’s cold downdraft spreads out, lifting the warmer air ahead of it. Seeing an arcus cloud approaching is your last chance to take action. It signals the imminent arrival of a squall line with a sudden, violent increase in wind, a drop in temperature, and heavy precipitation. Ignoring this sign is a grave error.
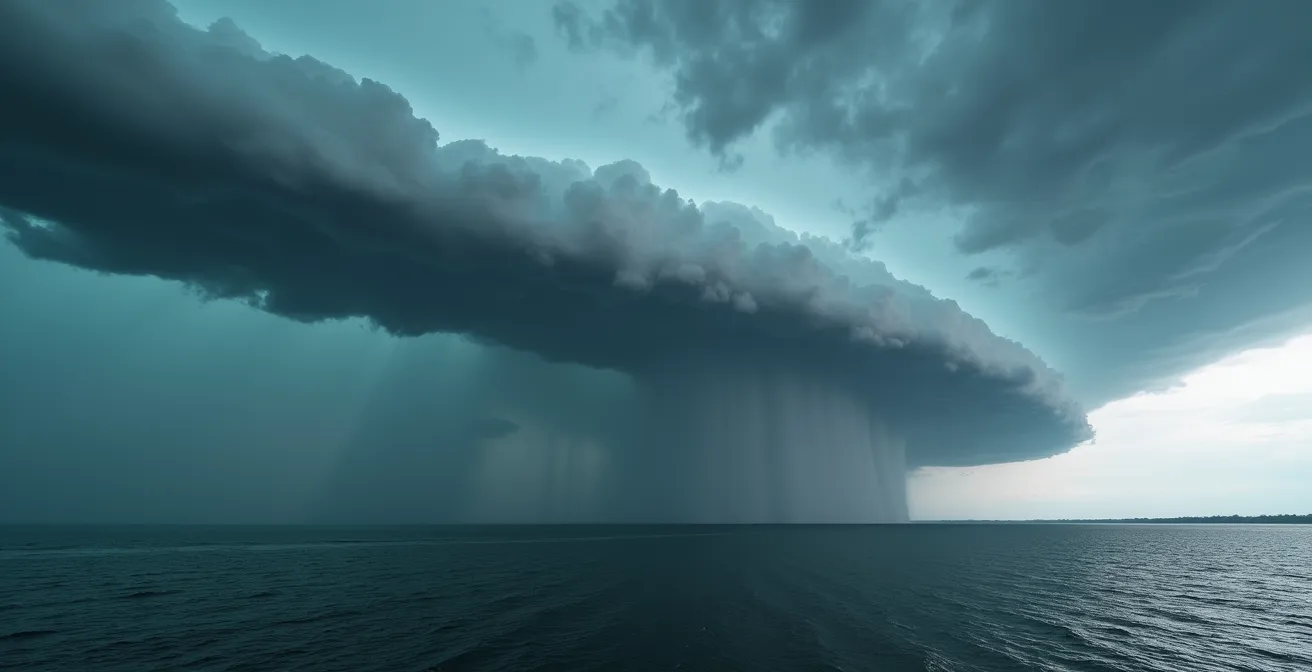
As the image above illustrates, the visual contrast between the dark, menacing shelf cloud and the calmer conditions ahead is a stark warning. A systematic observation protocol is necessary to translate these visual cues into timely, life-saving actions.
- Stage 1 – Monitor Vertical Growth: Every 15 minutes, observe the vertical development of cumulus clouds. Rapid upward expansion is the first alert.
- Stage 2 – Identify Arcus Formation: Actively scan the horizon for the tell-tale low, horizontal shelf cloud on a storm’s leading edge. This is your final warning to seek shelter or prepare.
- Stage 3 – Cross-Reference with Sea State: Corroborate cloud signs with changes on the water, such as a sudden shift in swell direction, the appearance of “cat’s paws” (small ripples from a new wind), or a “glassing off” effect just before the wind hits.
What to Do Specifically When You Capsize in Cold Water Alone?
A capsize in cold water when you are alone is one of the most dangerous situations a kayaker can face. The primary threat is not drowning, but the debilitating effects of cold water shock and hypothermia. The first 60 seconds after immersion are the most critical. Your survival depends on overriding instinct with a clear, rehearsed protocol. The initial cold shock triggers an involuntary gasp reflex and hyperventilation, which can lead to aspiration of water. Controlling your breathing is the absolute first priority.
Once the initial shock subsides (typically within 20-30 seconds), you enter the “thinking” phase. This is a brief window where you are still mentally clear and have functional muscle control. You must use this time to assess your situation and formulate a plan before your limbs become numb and useless. The single most important action is to secure your paddle. Without a paddle, re-entry and self-propulsion become nearly impossible. Many paddlers in a panic focus on the boat first, only to watch their paddle drift away.
The “action” phase involves a pre-determined hierarchy of self-rescue techniques. Your primary plan should be an efficient re-entry, such as a paddle-float rescue or, if you have the skill, an Eskimo roll. You must be able to perform this maneuver reliably in challenging conditions. If initial attempts fail, you must shift to a secondary plan to conserve energy and body heat while awaiting rescue.
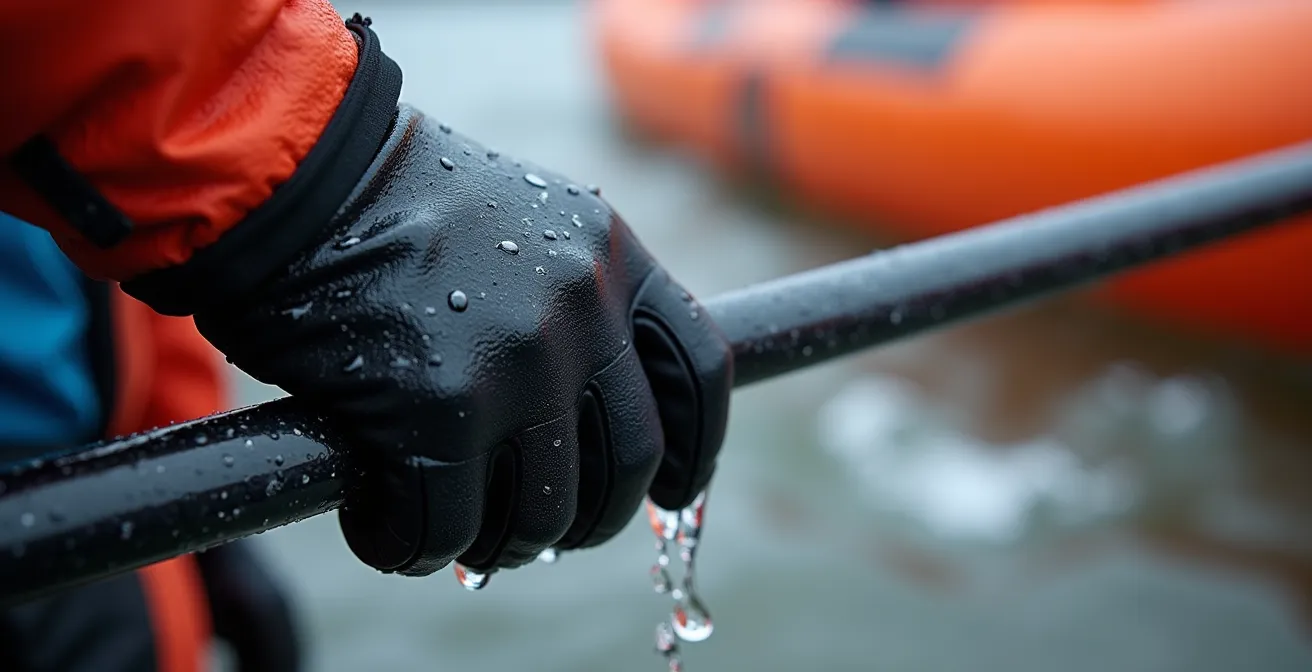
As this close-up of a rescue in progress shows, the technique requires deliberate, practiced hand-and-body coordination. A successful outcome is the result of training, not improvisation. Following a strict protocol is key, as demonstrated by an analysis of the critical first minute of a cold water immersion. A structured response plan is essential.
- BREATHE (0-20 seconds): Fight the gasp reflex. Force yourself to exhale slowly through pursed lips to regain control of your breathing.
- THINK (20-40 seconds): Assess the situation calmly. Locate your paddle first, then your kayak. Check for immediate hazards like rocks or boat traffic.
- ACT (40-60 seconds): Secure your paddle to your wrist or PFD *before* attempting anything else. Then, execute your rescue plan.
- Plan A (Re-entry): Attempt your primary self-rescue (e.g., paddle-float or roll) a maximum of two times to conserve energy.
- Plan B (Energy Conservation): If re-entry fails, get as much of your torso out of the water as possible by climbing onto the overturned hull to reduce heat loss.
- Plan C (Emergency Signal): If hypothermia becomes a pressing threat or you are drifting into greater danger, activate your Personal Locator Beacon (PLB) or EPIRB immediately.
Anchoring or Mooring Buoys: Which Method Saves the Seabed?
A core tenet of the self-supported adventurer is the “Leave No Trace” principle. When stopping for a break or an overnight stay, the choice of how to secure your kayak has a direct impact on fragile marine ecosystems. While throwing down an anchor may seem convenient, it can cause significant and lasting damage. Mooring buoys, when available, are always the superior choice for environmental preservation, but they are rarely found in the remote areas frequented by expedition kayakers. Therefore, mastering low-impact anchoring techniques is a crucial skill.
The primary damage from anchors comes from two sources: direct impact crushing sensitive organisms like corals or seagrass, and the “scouring” effect of the anchor chain or rope dragging across the seabed as the boat shifts with wind and current. A single anchor in a seagrass meadow can carve a “halo” of destruction, destroying vital habitat that can take years to recover. Seagrass beds are critical ecosystems that stabilize sediment and act as nurseries for countless marine species.
The first step in responsible anchoring is always bottom identification. Before even considering deploying an anchor, you must assess what lies beneath you. Polarized sunglasses are an essential tool for cutting through surface glare and identifying features like dark patches of seagrass, lighter sand, or the texture of a rocky bottom. If you cannot confidently identify a non-sensitive bottom like sand or bare rock, you must not anchor. The responsible choice is to find an alternative, even if it means paddling further.
When anchoring is deemed appropriate, a specific decision tree should be followed to minimize harm:
- Step 1: Identify Bottom Type: Use polarized sunglasses to scan the seabed. Look for sand or bare rock.
- Step 2: Avoid Sensitive Areas: If you see dark, uniform patches (likely seagrass) or any coral structures, do not anchor. Seek an alternative location.
- Step 3: Rocky Bottom Technique: On rocky bottoms, use a “rock lasso” technique with a padded rope to loop around a stable rock, avoiding any dragging.
- Step 4: Kelp Forest Technique: In kelp forests, a temporary “kelp wrap” can be used for very short stops (under 30 minutes), but it is not a secure long-term solution.
- Step 5: Prioritize Alternatives: Whenever possible, opt for shore-based tie-offs to trees or rocks (using webbing to protect them) or simply drift in a safe, open area instead of anchoring.
Key Takeaways
- Technique over strength: Proper paddling form prevents injury and increases endurance.
- Read the environment: Interpreting clouds and water surfaces is a more reliable guide than a forecast alone.
- Plan for failure: A redundant system for critical gear and self-rescue skills is essential for true autonomy.
How to Paddle Safely When the Mistral Wind Exceeds 40 km/h?
Paddling in high winds is one of the most technically demanding aspects of sea kayaking. Strong, offshore winds like the Mistral, which can exceed 40 km/h, present a dual threat: the wind itself pushing against the paddler and boat, and the steep, chaotic waves (wind chop) it generates. Safe navigation in these conditions is not about fighting the wind, but about understanding it and using the landscape to your advantage. The two primary concepts to master are lee shores and wind shadows.
A lee shore is a coastline that is sheltered from the wind. In a northerly Mistral, the southern coast of a large island or headland would be its lee shore. This provides a large, predictable zone of reduced sea state, often extending for kilometers offshore, making it a safe corridor for travel. Conversely, a wind shadow is a very small, localized pocket of calm found directly behind a small obstacle like a rock or a tiny cliff. While offering a moment of respite, wind shadows are extremely dangerous because the transition from the calm shadow back into the full force of the wind is abrupt and violent, and can easily capsize an unprepared paddler.
Strategic route planning is paramount. You must study topographic maps to identify not only lee shores but also katabatic acceleration zones. These are valleys or headlands that funnel and accelerate the wind, creating localized areas of extreme conditions. It is always better to plan a longer route that utilizes a predictable lee shore than to attempt a shorter route that crosses these dangerous wind funnels. In the water, maintaining forward momentum is key, as speed provides stability. A low brace on the windward side should be held constantly to counter gusts, and advanced ruddering strokes may be needed to maintain course.
| Feature | Lee Shore | Wind Shadow |
|---|---|---|
| Protection Distance | Kilometers of reduced sea state | Small pocket of calm |
| Predictability | Gradual, consistent protection | Abrupt, potentially violent transitions |
| Safety for Paddling | Safer – allows planned routes | Dangerous – sudden exposure to full wind |
| Best Use | Long-distance paddling in high winds | Brief rest stops only |
When to Kayak the Calanques to Avoid the Summer Flotilla?
Mastering the technical skills of a self-supported kayaker is the means to an end. The ultimate reward is the ability to access and experience world-class destinations like the Calanques National Park in a way that the average tourist cannot: with solitude and a deep sense of place. However, the Calanques in July and August are famously overrun by a “summer flotilla” of motorboats, tourist ferries, and rental kayaks, turning a wilderness experience into a crowded ordeal. The key to unlocking the true magic of this coastline lies in strategic timing.
The secret is to target the “shoulder seasons.” Travel experts consistently identify late May to early June and mid-September to early October as the ideal windows for exploration. During these periods, the weather is typically stable and pleasant, and more importantly, the water has warmed enough for enjoyable swimming. The intense crowds of the peak summer months have yet to arrive or have already departed, allowing for a much more intimate and spontaneous experience.
During the peak months of July and August, access to some of the most popular calanques, like Sugiton, is now restricted and requires advance online reservations to manage the overwhelming visitor numbers. Even with these measures, the water remains congested. In contrast, visiting in the shoulder season often allows you to paddle into world-famous sites like En-Vau or Port-Pin and find them nearly empty, especially on a weekday morning. This is the payoff for your autonomy: the freedom to choose not just your route, but the quality of your experience.
This strategic timing, combined with the technical skills to handle unpredictable weather that can occur outside of peak summer, empowers you to see a place on your own terms. It’s the final piece of the expedition planning puzzle, where logistical knowledge directly translates into a more profound and memorable adventure. Your hard-earned skills grant you access to the best version of these incredible landscapes.
Now that you have the technical framework for planning and executing a safe and successful self-supported expedition, the next step is to put it into practice. Start by honestly auditing your current skills, gear, and preparedness against these principles to identify areas for improvement before your next truly autonomous adventure.